Contents
Overview
Learn to simulate a glycan using GLYCAM-Web. Then, learn how to visualize the simulated glycan in 3D.
Optionally, see the Alternate Protocols section to learn three other ways to simulate a glycan at GLYCAM-Web.
Example System
This Scenario will use the glycan below as its example system. You are welcome to try using a different glycan.
DNeu5Aca2-3DGalpb1-3[DNeu5Aca2-6]DGalpNAca1-OME
This glycan is found in mucins and certain variations of it are relevant to cancer.
Here’s what Essentials of Glycobiology (Ch. 9) has to say about it. in the text below, the T-antigen is DGalpb1-3DGalpNAca, which is also known as the Core 1 O-glycan.
In many serum glycoproteins and mucins, the T antigen is substituted by sialic acid at C-3 of galactose and at C-6 of N-acetylgalactosamine. These substitutions add a negative charge to the O-GalNAc glycan. They also prevent other modifications of core 1. The cell surfaces of many leukemia and tumor cells contain large numbers of sialylated core 1 O-GalNAc glycans. On rare occasions, core 1 remains unsubstituted, leaving the T antigen exposed, for example, in cancer and inflammatory bowel disease. In these cases, it is likely that there is an abnormality in either the sialylation of core 1 or further extension and branching of core 1.
Background
Unlike peptide and DNA sequences, glycans generally do not form stable secondary structures. Also, they form branches in ways that peptides and DNA generally do not. Luckily, many of their structural preferences are established, and it is relatively easy to have a computer generate a realistic model.
GLYCAM-Web builds your glycan up from templates containing reasonable monosaccharide geometries. It connects them to each other using known preferences for linkage geometries.
All the protocols in this Scenario – the main one and all the alternates – introduce parts of the Oligosaccharide Modeling Services (OMS) at GLYCAM-Web.
What you need to know
You will need to be able to completely specify the chemical makeup of your glycan. In general, if you have the sequence for your glycan, you have all the information you need. If in doubt, expand the inset below to learn more.
If you don’t have a specific glycan in mind, no problem! You can just follow along with the example implementation.
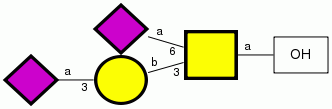
(a) In black type: a fully specified sequence of a disaccharide with derivatives. In gray are indicated its components, numbered as follows for convenience in this figure:
- The isomer (D or L).
- The abbreviation for the common name describing its stereochemistry, for example: ‘Glc’ for ‘glucose’, ‘Rha’ for rhamnose, ‘Man’ for ‘mannose’.
- The ring configuration (‘p’ for pyranose or ‘f’ for furanose).
- The nature and positions of any chemical derivatives (e.g., sulfate, acetyl). In this example, ‘Me’ represents a methyl group, and there are methyl groups at positions 2 and 3 of the rhamnose.
- The anomeric configuration (α or β).
- The linkage positions if your glycan contains more than one residue. Here, the rhamnose is linking to position 4 of the mannose.
- The nature of the reducing-end termination. here, the glycan is terminated with an O-methyl group (OME).
(b, c, d) The same sequence represented using (b) a chemical scheme, (c) 3D sticks, and (d) GLYCAM-Web’s variant of SNFG notation.
Other useful information
The website uses a carbohydrate nomenclature called GLYCAM Condensed Notation. People who are familiar with other nomenclatures for glycan sequences usually find it pretty easy to learn.
- Conformation of Carbohydrates (“Blue Book”)
- Many other papers and reviews
- Working on a way to make this list be annotated and automatically generated
Want to learn more about carbohydrate structure in general? Check out the references in the box!
Required Input
This Scenario requires very little of you. Exactly how little depends on what you would like to do:
If you wish to build a specific glycan
You will need complete information about the chemical makeup of your glycan. See above, in Background, if you need help with that.
If you just want to build something
The simplest thing to do will be to follow the example used herein. However, the Carbohydrate Builder will keep you from building something invalid. So, feel free to just click around and see what happens. For an even simpler interface, see the Oligosaccharide Libraries section in Alternate Protocols.
Protocol
These instructions are for the new version of the builder which might not be ready at the time you are able to view this. It’s coming soon. A preview can be seen at http://dev.legacy.glycam.org/cb_prototype. Note that as of this writing, it doesn’t build strucutures; it is merely a prototye of the interface.
- Specify the glycan sequence.
- Set any non-default options you like.
- Visualize the structure online (optional)
- Download structure files (optional)
The example sequence for this scenario is:
DNeu5Aca2-3DGalpb1-3[DNeu5Aca2-6]DGalpNAca1-OH
Step 1: Specifying the glycan sequence
Here, we will use the Carbohydrate Builder‘s point-and-click interface to set the chemical sequence for the oligosaccharide. (Link will open in a new window). Afterwards, check out the Alternate Protocols section, below, for other ways to set the sequence.
Step 1.1: Set the Main Chain
Build up a linear sequence starting from any monosaccharide at a non-reducing end and going all the way to the reducing end. We will call this the main chain.
The main chain we will use for our example comprises the bold-faced, black portions in the sequence:
DNeup5Aca2-3DGalpb1-3[DNeup5Aca2-6]DGalpNAca1-OH
Note that all except the portion in brackets is part of the main chain.
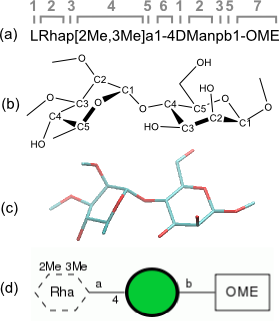
When you first open the Carbohydrate Builder, this is what you will see:
Carbohydrate Builder Landing Page
When you first arrive at the Carbohydrate Builder, this is what you will see. Note the portions of the page that are active: Configuration, and Monosaccharide. Note that each active dialog contains a small green box containing a question mark; clicking on these boxes will display dialog-specific Help. If you want to ensure the isomer (D or L) for your monosaccharide, then choose it in the Configuration box, Otherwise, just choose a monosaccharide, and the builder will choose the most common isomer for you.
Now, click on Neu5Ac. At this point, the dialog will change and the Linkage box will become active. Note that you could also have clicked D before clicking Neu5Ac.
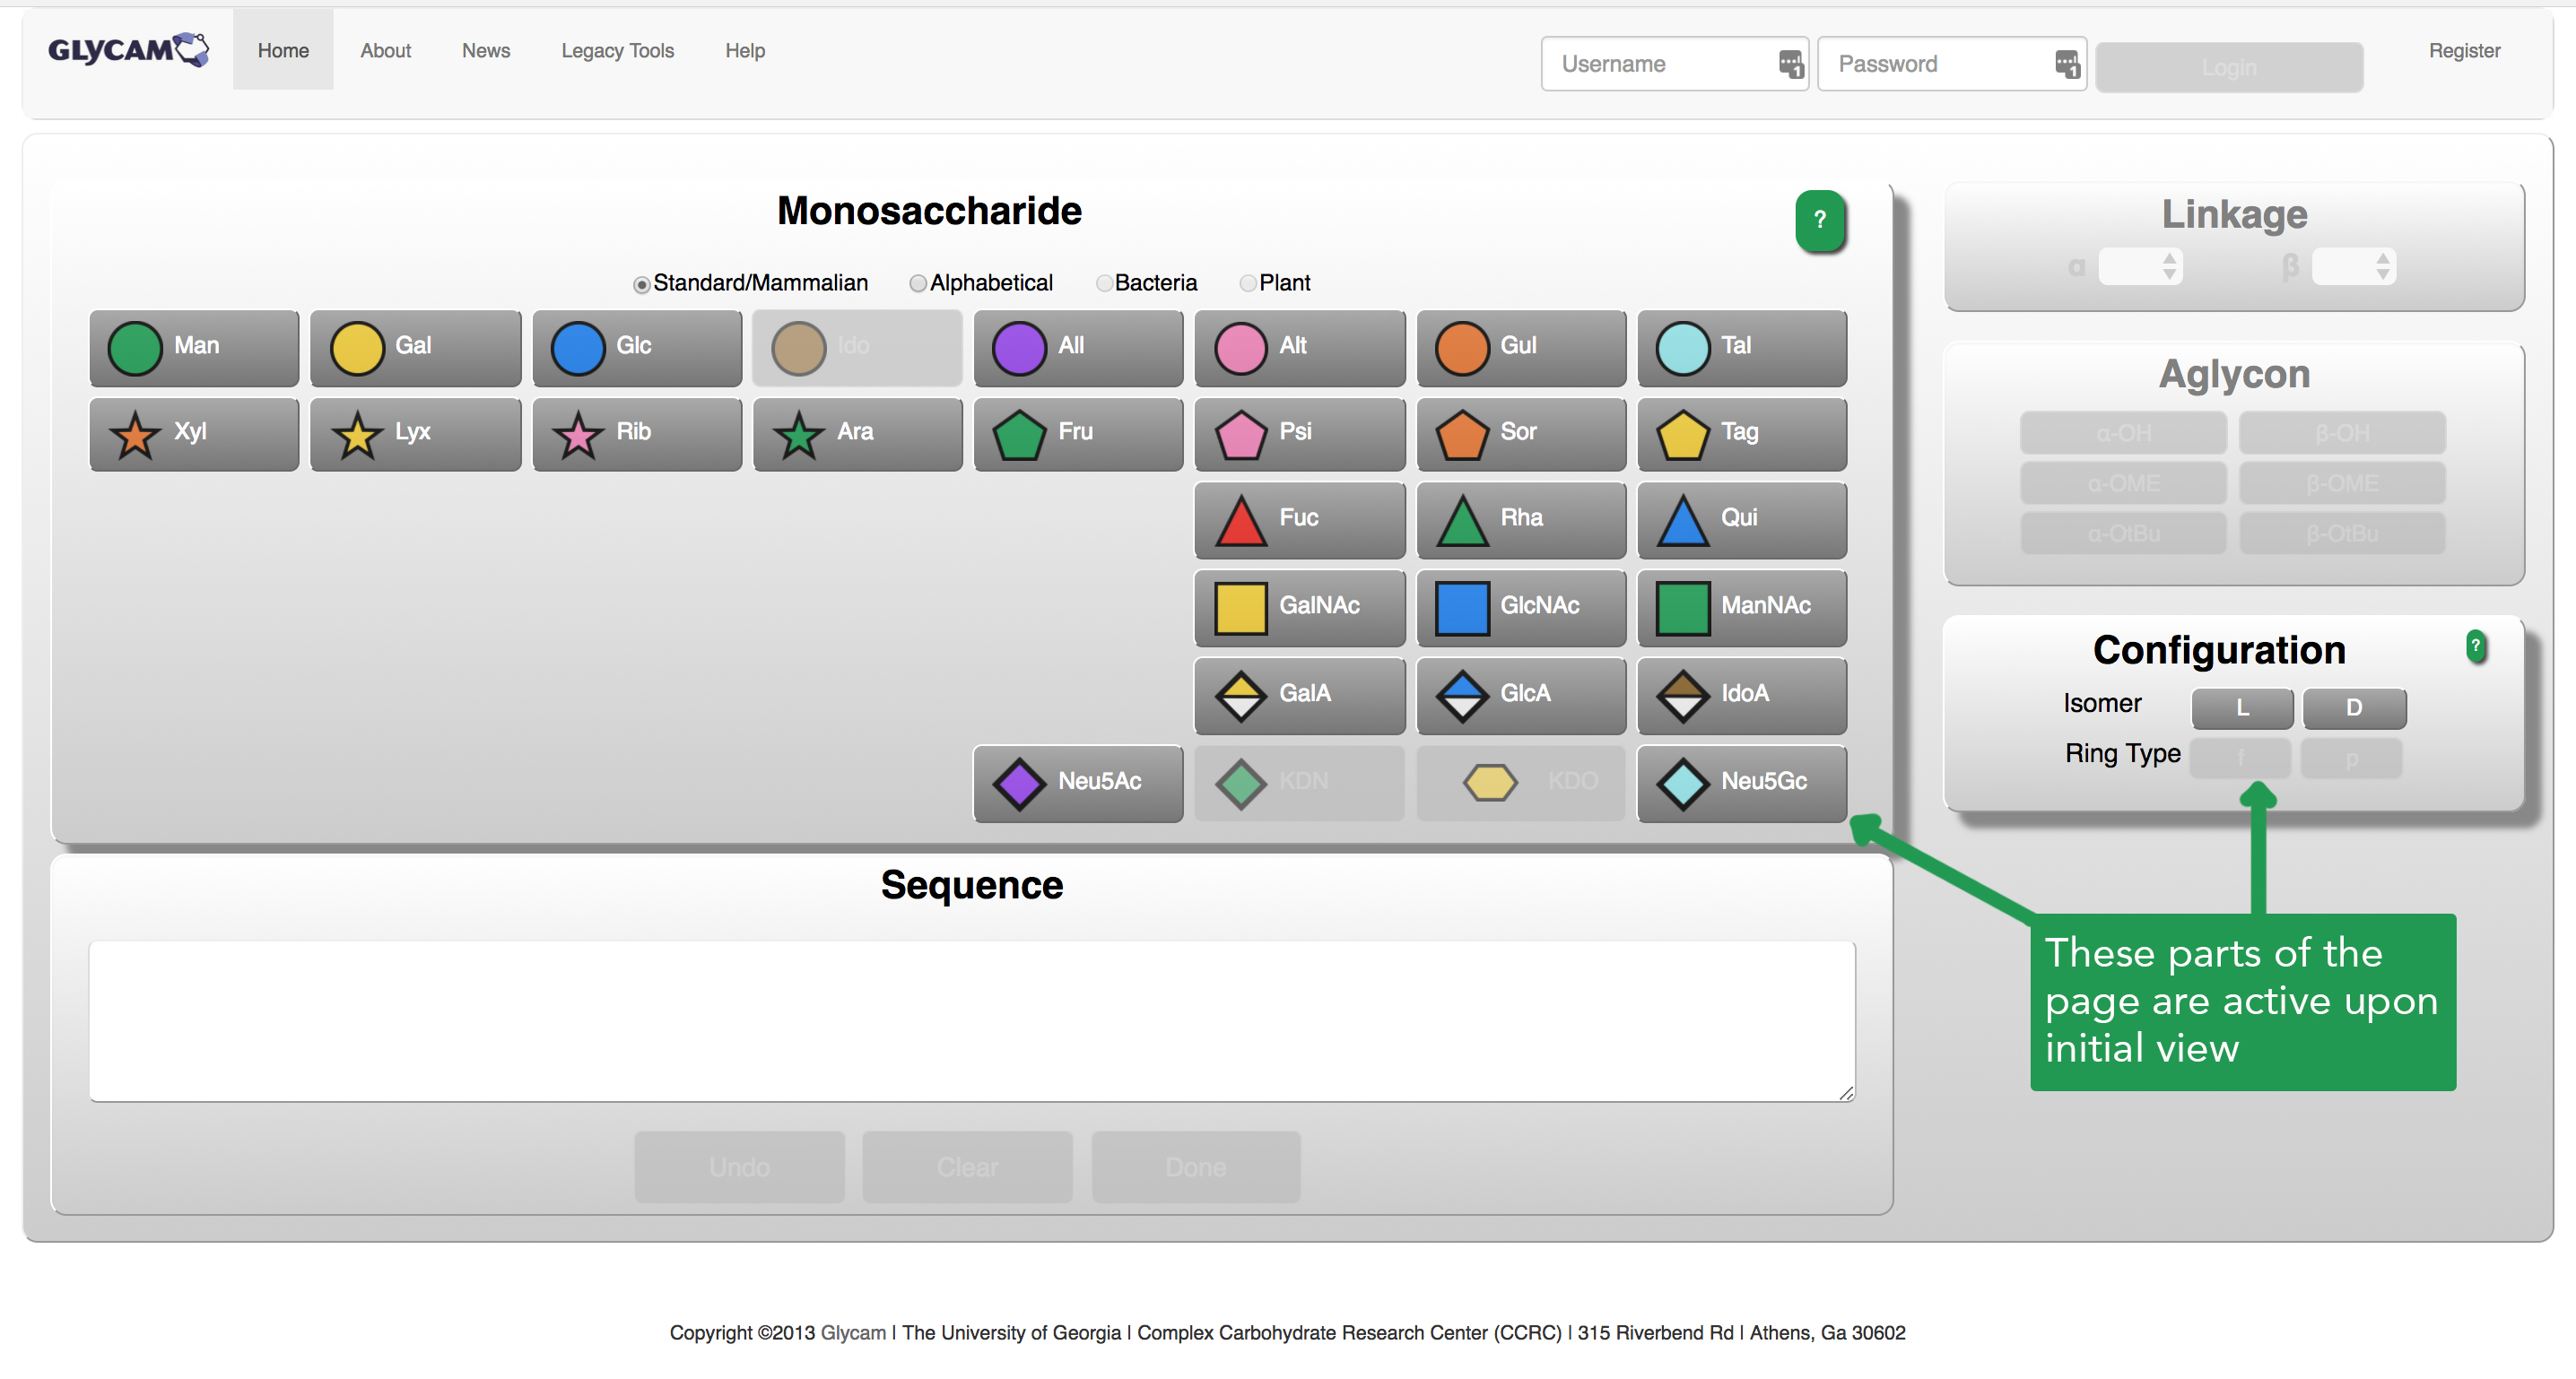
The Linkage box for ketoses
If you have just selected a ketose as your monosaccharide, the Linkage box will look like this. Note that it already knows that your linkage will be 2-x, and you have the option of linking as alpha or beta.
Choose α(2-3) as the linkage. At this point, the Configuration and Monosaccharide boxes become active again. Finish building the main chain. After you have built the sequence as far as the reducing-end GalpNAc, note that the Aglycon box is active and choose to terminate with an α-OH.
Aglyon dialog box

This box shows the available reducing-end terminations. Clicking one of these signals the termination of the main chain in the glycan sequence.
At this point, you have finished the main chain. Now you will add the other Neup5Ac as a branch off of the GalpNAc. Your Sequence box should look very similar to the one below.
The Sequence box with a completed main chain
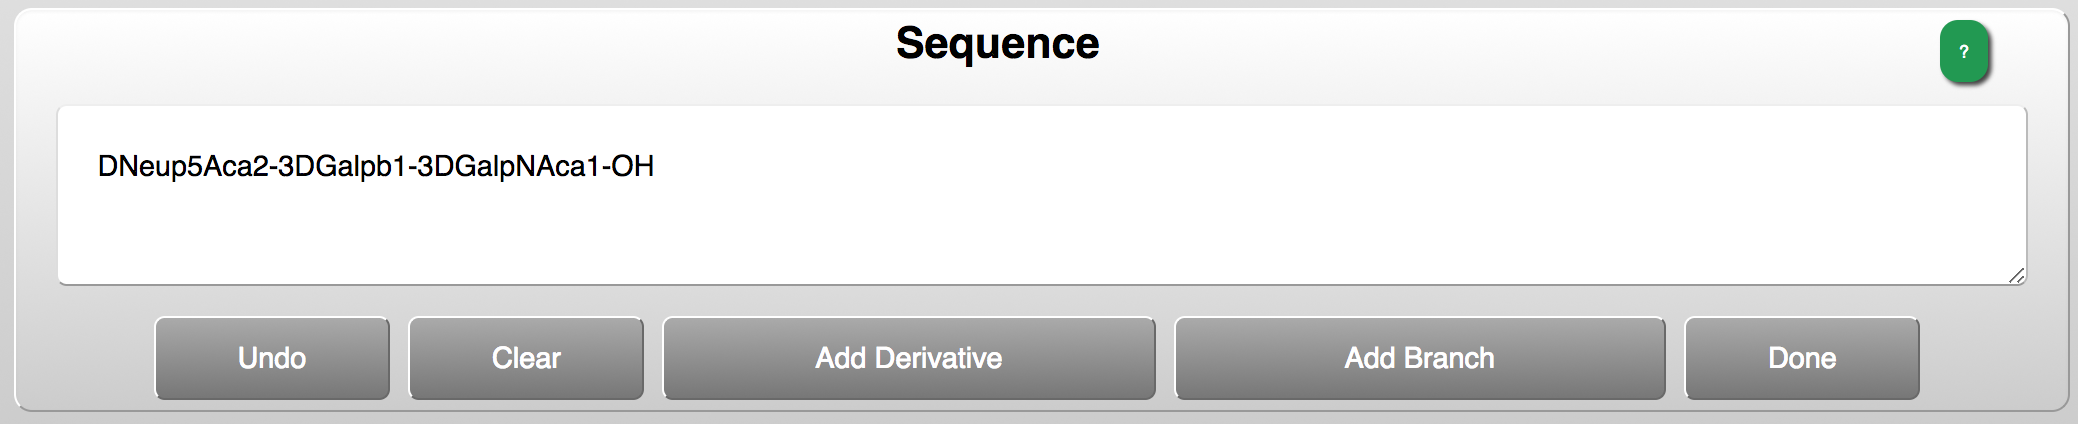
Once you have terminated your main chain with an aglycon, the Sequence box gives you a number of options. If your glycan is complete, merely click Done. Alternately, you can Add a Branch or Add a Derivative.
If you want to learn about adding derivatives (such as sulfate or methyl groups), see Alternate Protocols.
Step 1.2: Adding a Branch
Click on Add Branch. Notice the change in the Sequence box:
Choosing the location of a new branch

After you have clicked Add Branch, the CB will need to know where it will go. Note the Branch Options portion of the dialog. The monosaccharides that are able to receive a new branch are highlighted. Choose the monosaccharide where your branch will terminate.
Click on the GalpNAc. Now, in the sequence, just in front of the GalpNAc, you will see a new set of square brackets:
A Branch Begins With Square Brackets
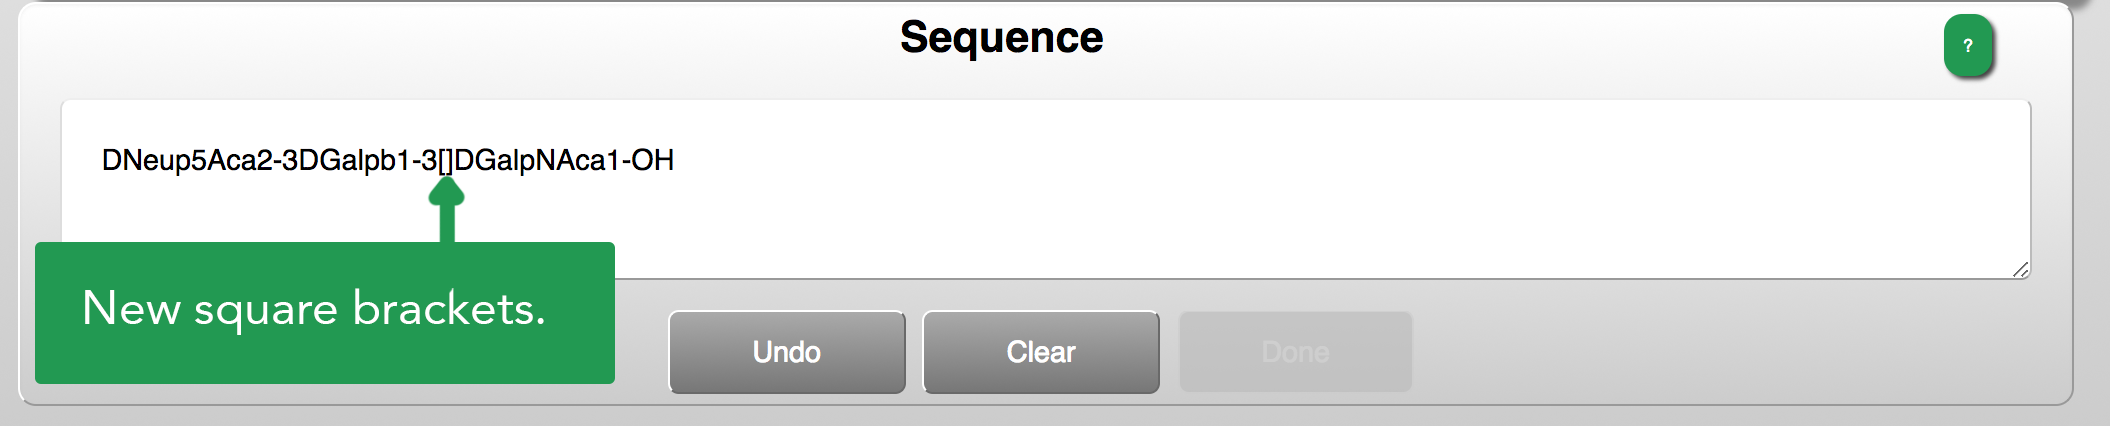
When you have chosen a location for your branch, the dialog places a set of square brackets where the new branch will go. As you build the branch, its sequence will show inside these brackets.
Here is a reminder of the sequence. Shown in bold are the parts not yet added:
DNeup5Aca2-3DGalpb1-3[DNeup5Aca2-6]DGalpNAca1-OH
Build the DNeup5Aca2-6 portion. When you have chosen the ‘a2-6’, the Finish Branch option will become active:
Finishing a Branch
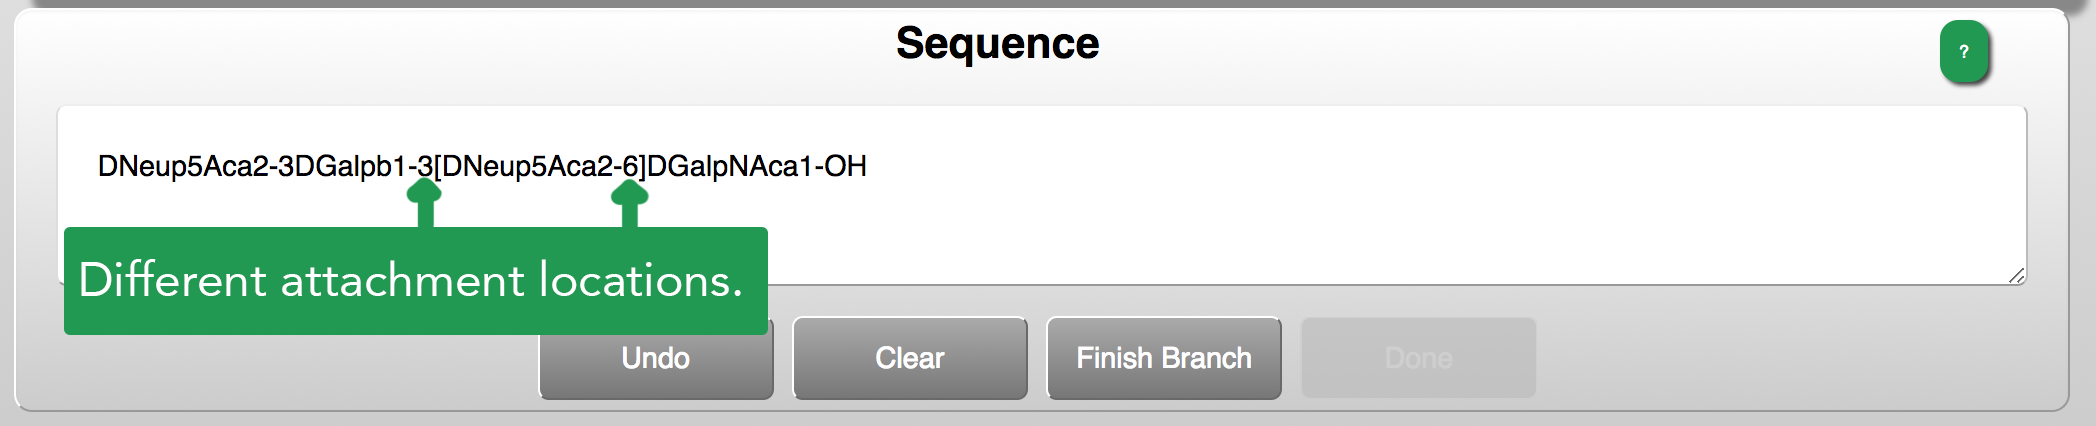
If the Finish Branch button is not available, it is likely that you are trying to connect the branch at an already occupied location. Try a different linkage option.
Click on Finish Branch and then on Done.
Step 2: Setting options
After clicking Done, you will proceed to the Options page. You aren’t required to set any additional options, but they are available. This Scenario assumes that you do not make changes. To learn more about the available options, see Additional Information – Descriptions of Available Options, below.
The OMS Options Page
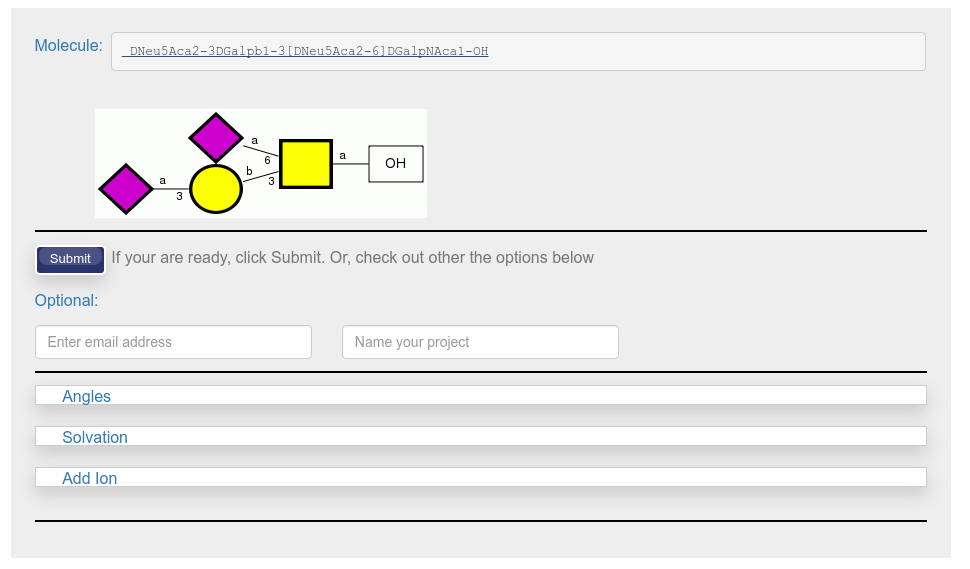
This image shows all possible options. At the top, the sequence for your molecule is shown. If you are happy with that and wish to accept the website defaults, you may simply click Submit, but we recommend filling in an email address and project name if you are not logged in. Users who are logged may set these preferences globally and override those preferences here if desired. The option “Rotamers” will not be present if your glycan does not typically populate multiple rotamers. Similarly, “Add Ion” is only present if the glycan has a non-zero overall charge. The “Angles” and “Solvate” options will always be present.
After clicking “Submit” you will be taken to a page where you can visualize and/or download structure files for your glycan.
Step 3: Visualizing the structure
As shown in the image, once the build for any given glycan is complete, a “Visualize” button will become active. Clicking the button will open a frame in which a 3D, interactive representation of your glycan will be visible.
(Need images for new site design.)
Step 4: Downloading structure files
From the same page, you can download structure files for your glycan.
Most people will just want a PDB file for their glycan. If that is all you want, clicking the “Download” button will get you the single PDB file.
If you want any other file type, you must download all files for the glycan. If multiple structures are present, then you can choose to download all files for one or more of the structures. To learn more about the types of files in the download, please see the Annotated Output – Files available for download section.
Annotated Output
This section contains additional comments about the output.
Online visualization
Info about that
Visualizing downloaded files
Here is a post explaining how to use VMD to view glycans in PDB files.
Files available for download
a description of all the available files
Information to facilitate publications
How to find publication-worthy information about your structure’s generation.
How to cite the builder.
Additional Info
Additional information that might be useful to some.
Descriptions of Build Options
This section explains the different options available to you after you complete a glycan sequence.
Rotamer Generation
info about rotamers – what they are and how we generate them.
Angles
About setting glycosidic angles using the Angles dialog.
Addition of Counter-ions
How this works
Addition of Solvent
How this works
GLYCAM-Web’s Minimization Protocols
How the minimization happens
Alternate Protocols
- The Oligosaccharide Libraries
- The GAG Builder
- Build by Text
- Using the Carbohydrate Builder to Add Derivatives to a Glycan
- Solvating and Adding Ions
- Choosing Rotamers and Setting Angles
A.P. 1: The Oligosaccharide Libraries
Choose this method if
- You don’t have a specific glycan in mind and are not comfortable with glycan nomenclatures
- You just want to build something quickly
- Your glycan is common in mammalian biochemistry, for example Man9
A.P. 2: The GAG Builder
Choose this method if
- You have a specific glycan in mind and it isn’t a glycosaminoglycan (GAG)
- You just want to build something, but want to be more involved in the process of specifying the glycan
- You want to play around with a point-and-click interface
A.P. 3: Build by Text
All the arguments for the Carbohydrate Builder apply here, too, except that your glycan is a glycosaminoglycan (GAG).
A.P. 4: Using the Carbohydrate Builder to Add Derivatives to a Glycan
Choose this method if
- You are comfortable with GLYCAM Condensed Notation
- You have condensed notation for a glycan and want to get to the download and options pages as quickly as possibl
A.P. 5: Solvating and Adding Ions
A. P. 6: Choosing Rotamers and Setting Angles
Troubleshooting
- A browser with javascript enabled.
- If you wish to follow the protocols for visualizing downloaded files using VMD, you will need to download and install VMD. Please see this page for more information about that.
